
Custom Domain
Custom Domain
Section titled “Custom Domain”Connect your own domain to your Codepup AI project and publish your website under a professional, branded URL.
Codepup AI handles deployment, SSL, and verification automatically - you only need to update your DNS once.
Why Use a Custom Domain?
Section titled “Why Use a Custom Domain?”A custom domain helps you:
- Look professional & trustworthy
- Build a real brand identity
- Share clean, memorable URLs
- Launch production-ready projects for clients
- Remove Codepup AI branding (based on plan)
Before You Start
Section titled “Before You Start”Make sure:
- Your project is published
- You own a domain (GoDaddy, Namecheap, Cloudflare, Google Domains, etc.)
How Custom Domains Work in Codepup AI
Section titled “How Custom Domains Work in Codepup AI”- Publish your project
- Open Publish → Custom Domain
- Add your domain name
- Configure DNS records
- Verify & go live
Step-by-Step Setup Guide
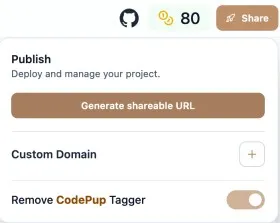
Section titled “Step-by-Step Setup Guide”Step 1: Publish Your Project
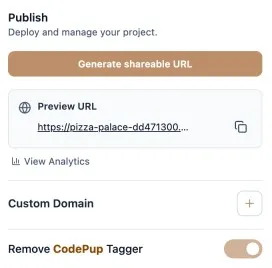
Section titled “Step 1: Publish Your Project”From your project dashboard, click Generate sharable URL.
This deploys your project and enables domain support.
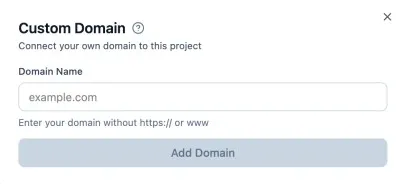
Step 2: Open Custom Domain Settings
Section titled “Step 2: Open Custom Domain Settings”Go to Publish → Custom Domain and click the ➕ Add Domain button.
Step 3: Add Your Domain Name
Section titled “Step 3: Add Your Domain Name”Enter your domain without https:// or www.
Example:
Click Add Domain.
Step 4: If Project Is Not Deployed
Section titled “Step 4: If Project Is Not Deployed”If your project isn’t deployed yet, you’ll see this message:
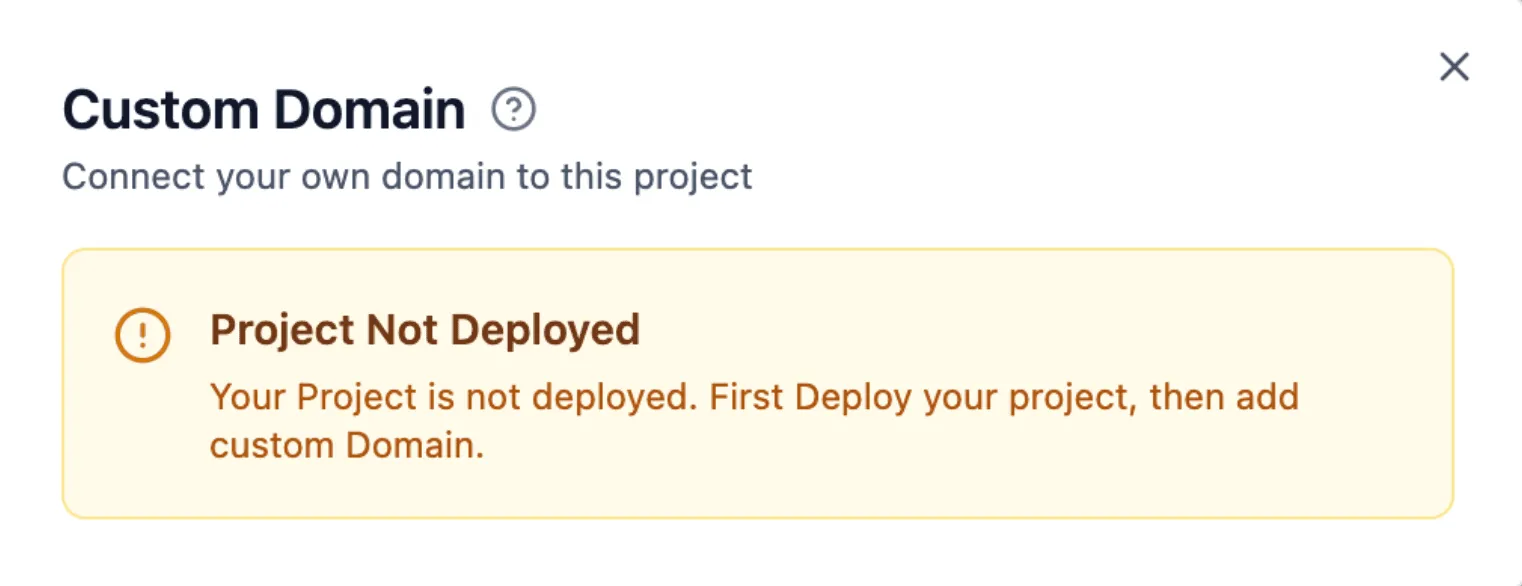
👉 Fix:
Go back and click Generate shareable URL, then retry adding the domain.
Step 5: Configure DNS Records
Section titled “Step 5: Configure DNS Records”Once added, Codepup AI shows the exact DNS records you need.
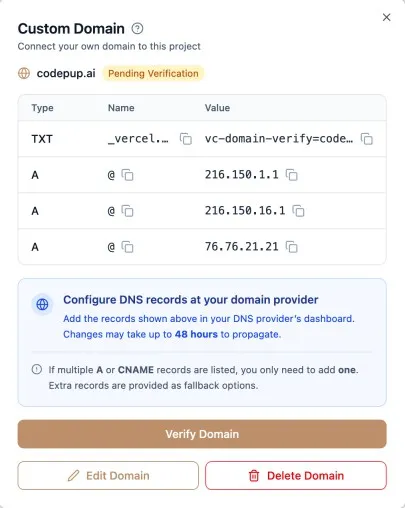
Add these records in your domain provider’s DNS dashboard:
| Type | Name | Value |
|---|---|---|
| TXT | _vercel | vc-domain-verify=... |
| A | @ | 216.150.1.1 |
⏳ DNS propagation can take up to 48 hours.
Step 6: Verify Domain
Section titled “Step 6: Verify Domain”After DNS updates propagate, click Verify Domain.
Your domain status changes from:
Pending Verification → Active
✔ Domain live
✔ HTTPS enabled automatically
✔ SSL handled by Codepup AI
Remove Codepup Tagger
Section titled “Remove Codepup Tagger”You can remove Codepup AI branding using the toggle in the Publish section.
Availability depends on your subscription plan.
SSL & Security (Automatic)
Section titled “SSL & Security (Automatic)”Every custom domain includes:
- Free HTTPS / SSL
- Automatic certificate renewal
- Secure global infrastructure
- No manual setup required
Best Practices
Section titled “Best Practices”- Prefer root domain (
example.com) orwww.example.com - Keep DNS TTL low during setup
- Verify before sharing publicly
Your Codepup AI project deserves a real home 🐶🌍